Armory 3D Community channel

Don’t forget to check the new video above as well (I’m double posting).

2 Likes
3 Likes

We now have Networking Logic Nodes!!

5 Likes

Awesome, Armory3D now has websockets! Video is rather a (sloppy) first presentation than a tutorial. The example he uses, is IMHO overly complicated and only presented in very small snippets. Basic examples with access to the files simply rock.

3 Likes

Yeah, the video is not the most beginning friendly one but I can’t make a tutorial without understanding the nodes much myself. The next step would be to get some documentation and example files for the nodes.

3 Likes

This is not a tutorial, but my first unsuccessful attempt to make it work. It needs attention by somebody knowledgeable. Maybe a dev´, who has a little bit of time to spare…

On Linux:

See also GitHub - joewalnes/websocketd: Turn any program that uses STDIN/STDOUT into a WebSocket server. Like inetd, but for WebSockets.

I tried this after installation of websocketd:

#!/bin/bash
for ((COUNT = 1; COUNT <= 10; COUNT++)); do
echo $COUNT
sleep 1
done

Save above script as count.sh
Make sure its executable
Execute in bash console: websocketd --port=8080 --devconsole ./count.sh

Looking at the bash console output, you get your server address to copy and paste
http://localhost:8080/ where localhost is a (valid! and exchangeable with the actual name) variable for your local machine name. You copy and paste this in your browser URL field to see the dev console.

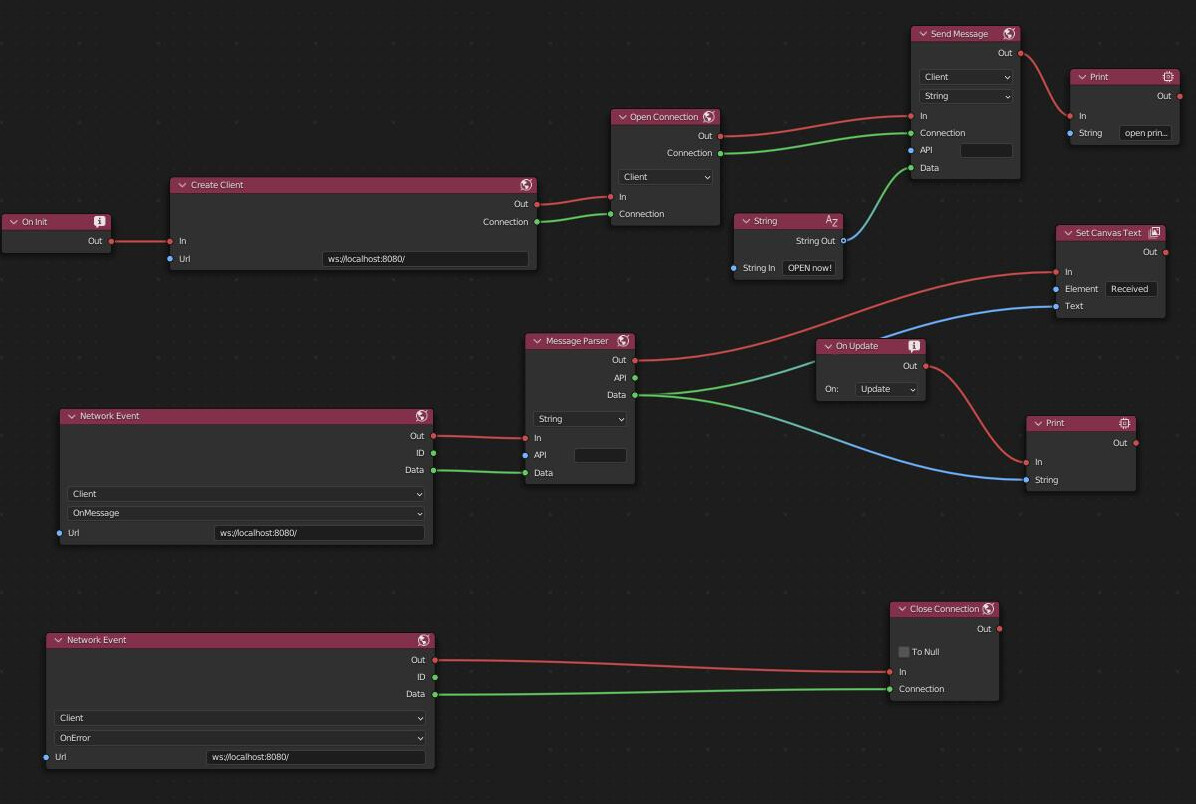
Once you clicked on the hook in the upper left corner the websocket server starts to count. Now you should be able with a client setup from armory3d using ws://localhost:8080/ as source URL. I say should, cause it did not yet work for me.

My_Blend_so_far.zip.blend (109.2 KB)
Unzip!

2 Likes

OK. Got it working. Based on my previous post:

This is a bad tutorial, my attempt to make websockets work. Actually it is the result of tinkering with the nodes, without (yet) knowing enough of networking.Watch the video tutorial on the community channel. After watching it a couple of times, i think it is notbad at all. But it lacks IMHO the example file. If you are new to network programming like me, this is a quite hard to digest, cause you need additional background information. Newbies and “Artists” prefer the working example file. And i mean not my sub-optimal specimen here, but the one from the video. I hope it will get released.

On Linux:

See also GitHub - joewalnes/websocketd: Turn any program that uses STDIN/STDOUT into a WebSocket server. Like inetd, but for WebSockets.

After installation of websocketd:

#!/bin/bash
for ((COUNT = 1; COUNT <= 100; COUNT++)); do
echo $COUNT
sleep 1
done

Save above script as count.sh in your project folder.
Make sure its executable
Also make sure the count program and blender program do not run on the same port address.
Change port number for one of them should suffice. I changed it in Blender/Armory preferences like so:

Execute in bash console: websocketd --port=8080 ./count.sh

Websockets_minimal.blend (885.6 KB)
Bundled.zip.hx (1.3 KB)

Rename Bundled.zip.hx to Bundled.zip. Extract to project folder.
Open my example blend. Set Browser as target. Play.

Thats it.

Edit: For some reason the blend did not work anymore when i re downloaded it to check.
I re-edited the previous version which worked. However i do not see ANY difference. If anybody finds the difference, please let me know. Just use this one:

Websockets_minimal2.blend (885.6 KB)

Note:
In the Browser you get to the console messages with F12, you will not see any messages in the bash console for browser programs.

3 Likes

Special thanks to @QuantumCoderQC for adding draw to material image texture (in the past).

Seems like the biggest difference to canvas text is, that i can bind the text plane to an object and move it around. Thats why he calls it 3D. If i do not want to move it in 3D space i use canvas, cause it is a lot simpler to set up.

2 Likes
3 Likes
2 Likes

Hmm, why do you show the nice devouring burn effect without telling us how to do that? Or is this an ad for another video?

1 Like

It is a ad for the armoryblender video I guess you could say. I linked all his videos in the description related to this topic. He is the one who explained how to make that effect and don’t want to have repetitive tutorials when armory needs tutorials so badly.

1 Like

You mean that one? Body Aura & Shield effect
Not quite the same, this is just a nicely made glow effect, but without getting “eaten up”. Link?

2 Likes

This should be what you are looking for:

3 Likes
1 Like

Could you (pretty) please post the example file used in the networking tutorial video? It is so much guesswork and a waste of time without it. And its Xmas time, where all are busy with family stuff…

2 Likes

I agree. We need example files to understand properly. That and documentation for people to be at least able to understand the new tools. What else would be the point of having a set of new nodes that people can’t use.

1 Like

If the dev could help with at least one example, like the one shown, we had a chance to understand and try it out. That would lead to more examples and would increase the willingness to help with some documentation. Nobody who only guesses can write a solid doc. Nuff said.

1 Like

I just found this by accident. Added Network Zui Chat Example by Onek8 · Pull Request #61 · armory3d/armory_examples · GitHub

2 Likes