If you want to start learning Armory 3D then I have the perfect solution for you: https://www.youtube.com/channel/UCE4OLdXwHgCGudp4IK-w25w
This channel isn’t just an Armory 3D tutorials channel but an open plateform inviting / screaming at any and all Armory users to come share their knowledge in any format possible. A simple blend file that I can explain, a slideshow or a video tutorial. If is has voice over or not. If it is “good” or not. Help out the world and the community by sharing solutions to problems you’ve encountered and don’t want other to struggle to figure out. Contact me at armorycommunity@gmail.com to host your Armory tutorials on the new global hub for Blenders favorite addon game engine.
7 Likes
Very good idea! Maybe you could start by going over the basics in the Wiki (like the playground tutorial) and then progress through some of the exanple blends until more community examples present themselves.
For the armory 3d community channel I plan on making tutorials explaining different armory features for example variable trees, that I will upload in a second.
Once we have a bunch of tutorials exploring specific tools we can start making tutorials about building games and Quantum Coder and I where discussing community/open game collaboration projects.
So for now where in the early stages of the channel and once we has a bunch of armory3d features explained, the will be a lot more opportunities for community interactions. Hope to see you bring your knowledge to the table too.![]()
3 Likes
Thanks! That plan sounds solid. Very well thought out.
Hope to see you bring your knowledge to the table too.
We’ll see! I’ve thought about stuff like that, but I’ll cross that bridge if/when I get there. It is good to know that the oppotunity is there (and growing). Thanks for doing all you have for so long. It’s very encourging for the Armory Project as a whole.
community/open game collaboration projects.
What ideas do you guys have, so far? One idea I had was to start an open sandbox world in the style of GTA/Saints Row, but without the goal of finishing it or anything; just using it as a springboard/context within which to play around with (develop and test) game mechanics that could be used in other games, like vehicle physics, vehicle customization, character customization, large level streaming and LOD handling, dynamic NPC spawning and management, etc.
Granted, a game like this is something I would like to complete, in the future, so doing it as an open project may not be the best idea to start with. Either way, doing sandboxes for people to play with might be something to consider, because it can give some initial context for them to develop the initial stages of a feature, rather than also building the context themselves (like AI for an FPS style game or a weapon management system). I guess templates kind of do this, now that I think about it, but eh.
Would this be in addition to a Game Jam or possibly replace it (at least, temporarily)?
2 Likes
Well we will no doubt vote on the game and probably has multiple open community projects but starting off simple I think.
I do plan on organizing a game jam but all the games will be open sourced and used as a way to showcase armory and learn from the games by looking behind the scenes. (Game jam will probably take place all November.
But of course the community projects on the channel will have to start later. First I want to put up a few new tutorials then announce the new channel on my main channel and see we’re we go from there.
The one thing I really need is for people to take the leap and contribute to the community channel. I mean even if it is just a mechanic explained or an update tutorial to something I’ve already covered. If other people don’t help me then I’m afraid the channel may just fade into oblivion.
2 Likes
Sounds good.
One other suggestion is the adapt written explanations from the forum, Github, or Discord into a video tutorial, rather than waiting for someone to make a video themselves. Might be easier for people to contribute knowledge.
And these multiple identities by you is getting confusing. Lol (Armory Comminity Channel, Exceptional 3D, and Willbot Studio)
1 Like
Yeah I’ve had a few alias’s but I’m exceptional 3D now. I just host the armory community channel. Willbot studios is the old name for exceptional 3d.
1 Like

(check video description too)

3 Likes

2 Likes

2 Likes
Don’t forget to check the new video above as well (I’m double posting).

2 Likes

3 Likes
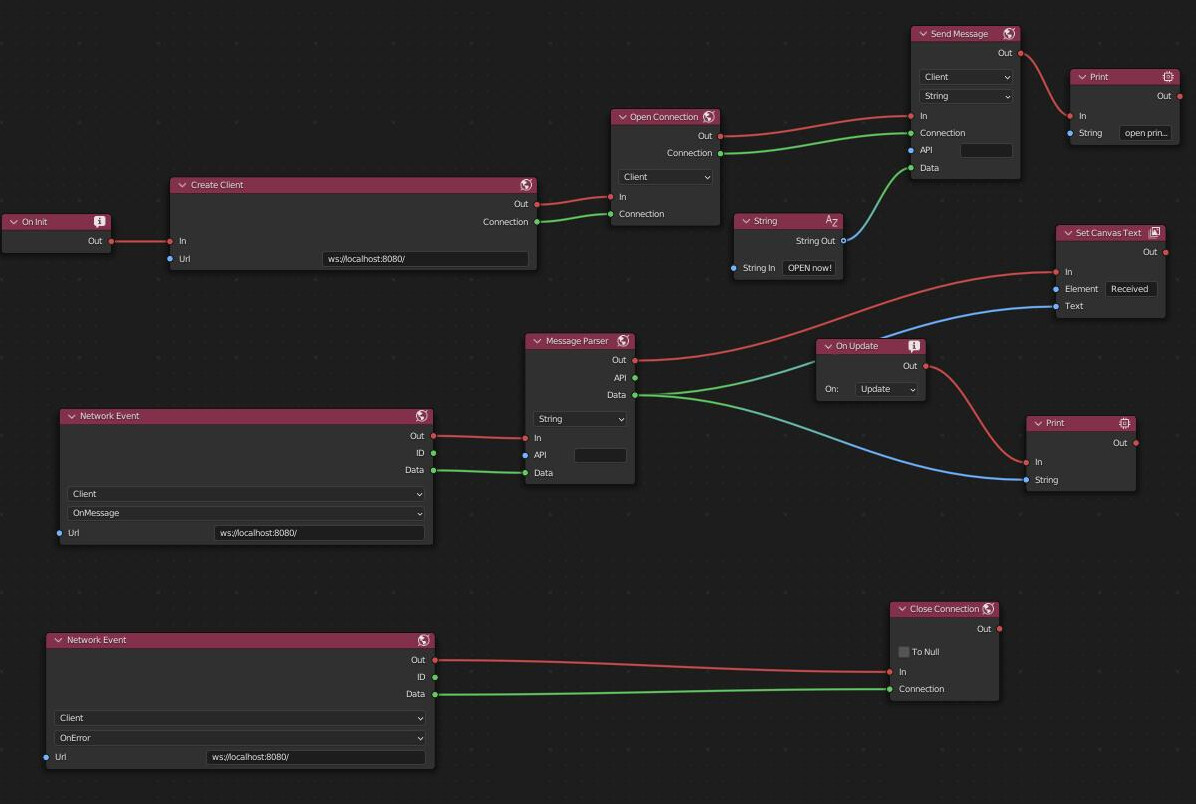
We now have Networking Logic Nodes!!

5 Likes
Awesome, Armory3D now has websockets! Video is rather a (sloppy) first presentation than a tutorial. The example he uses, is IMHO overly complicated and only presented in very small snippets. Basic examples with access to the files simply rock.
3 Likes
Yeah, the video is not the most beginning friendly one but I can’t make a tutorial without understanding the nodes much myself. The next step would be to get some documentation and example files for the nodes.
3 Likes
This is not a tutorial, but my first unsuccessful attempt to make it work. It needs attention by somebody knowledgeable. Maybe a dev´, who has a little bit of time to spare…
On Linux:
I tried this after installation of websocketd:
#!/bin/bash
for ((COUNT = 1; COUNT <= 10; COUNT++)); do
echo $COUNT
sleep 1
done
Save above script as count.sh
Make sure its executable
Execute in bash console: websocketd --port=8080 --devconsole ./count.sh
Looking at the bash console output, you get your server address to copy and paste
http://localhost:8080/ where localhost is a (valid! and exchangeable with the actual name) variable for your local machine name. You copy and paste this in your browser URL field to see the dev console.

Once you clicked on the hook in the upper left corner the websocket server starts to count. Now you should be able with a client setup from armory3d using ws://localhost:8080/ as source URL. I say should, cause it did not yet work for me.
My_Blend_so_far.zip.blend (109.2 KB)
Unzip!
2 Likes
OK. Got it working. Based on my previous post:
This is a bad tutorial, my attempt to make websockets work. Actually it is the result of tinkering with the nodes, without (yet) knowing enough of networking.Watch the video tutorial on the community channel. After watching it a couple of times, i think it is notbad at all. But it lacks IMHO the example file. If you are new to network programming like me, this is a quite hard to digest, cause you need additional background information. Newbies and “Artists” prefer the working example file. And i mean not my sub-optimal specimen here, but the one from the video. I hope it will get released.
On Linux:
After installation of websocketd:
#!/bin/bash
for ((COUNT = 1; COUNT <= 100; COUNT++)); do
echo $COUNT
sleep 1
done
Save above script as count.sh in your project folder.
Make sure its executable
Also make sure the count program and blender program do not run on the same port address.
Change port number for one of them should suffice. I changed it in Blender/Armory preferences like so:

Execute in bash console: websocketd --port=8080 ./count.sh
Websockets_minimal.blend (885.6 KB)
Bundled.zip.hx (1.3 KB)
Rename Bundled.zip.hx to Bundled.zip. Extract to project folder.
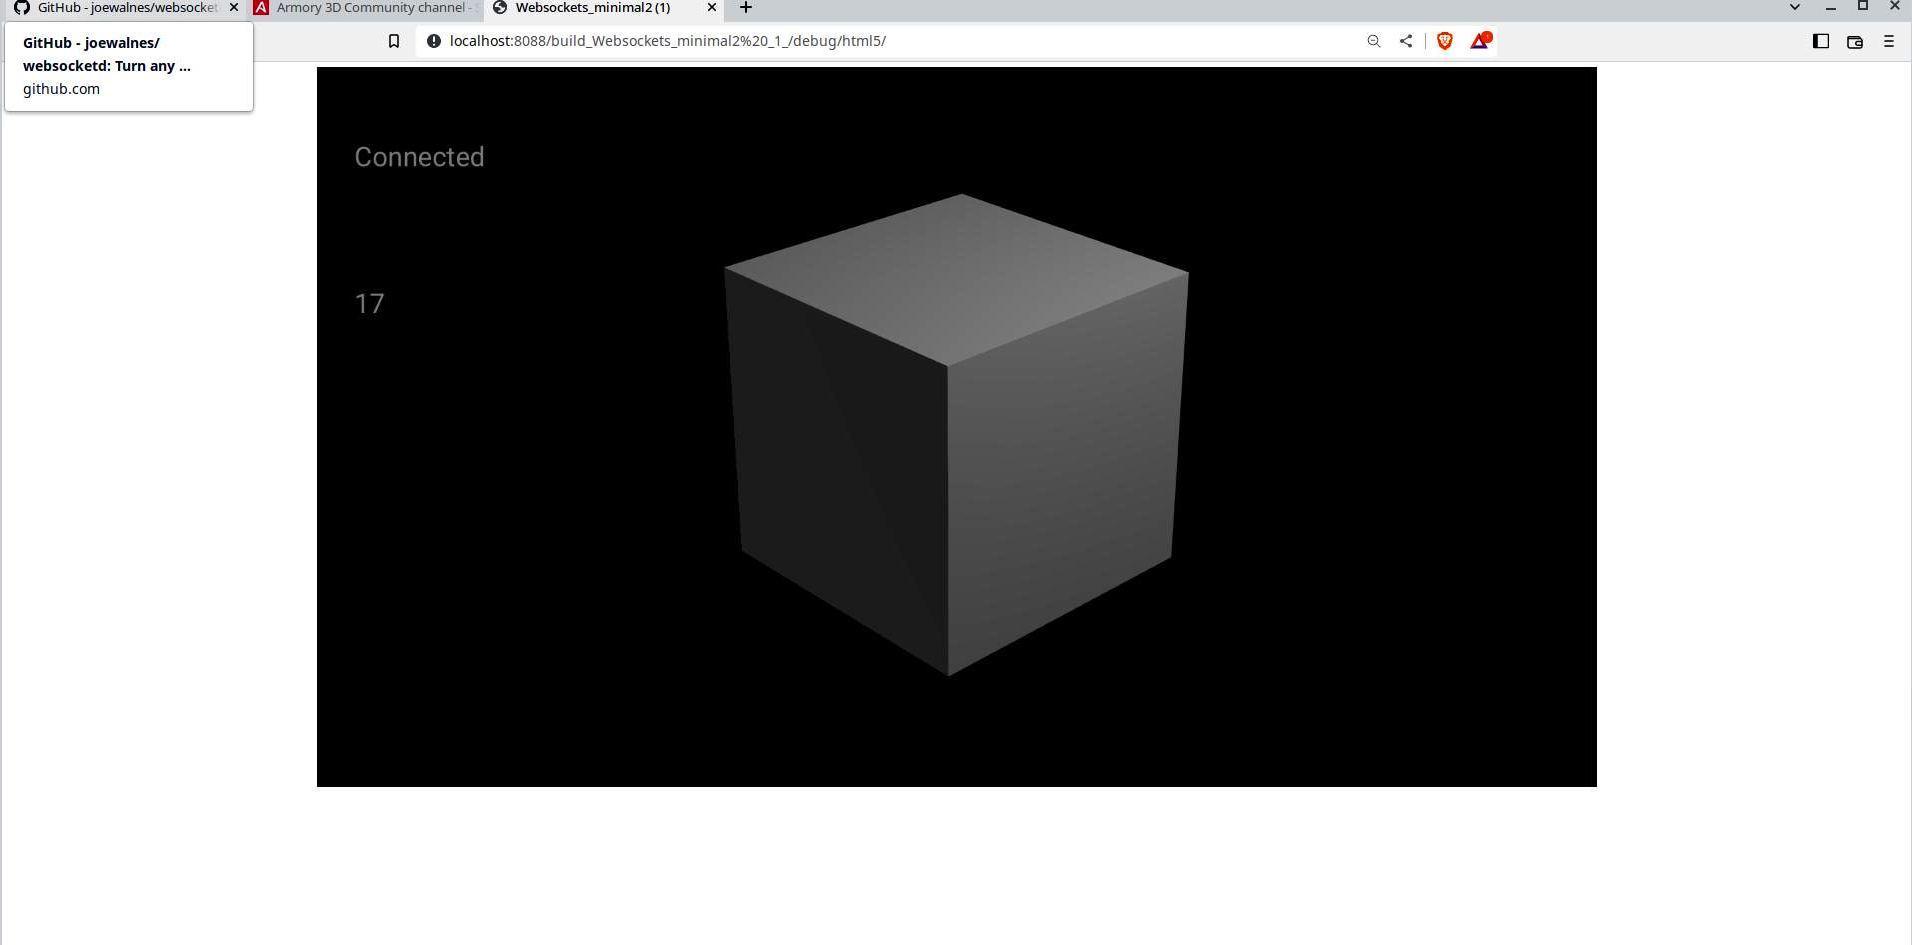
Open my example blend. Set Browser as target. Play.
Thats it.
Edit: For some reason the blend did not work anymore when i re downloaded it to check.
I re-edited the previous version which worked. However i do not see ANY difference. If anybody finds the difference, please let me know. Just use this one:
Websockets_minimal2.blend (885.6 KB)

Note:
In the Browser you get to the console messages with F12, you will not see any messages in the bash console for browser programs.
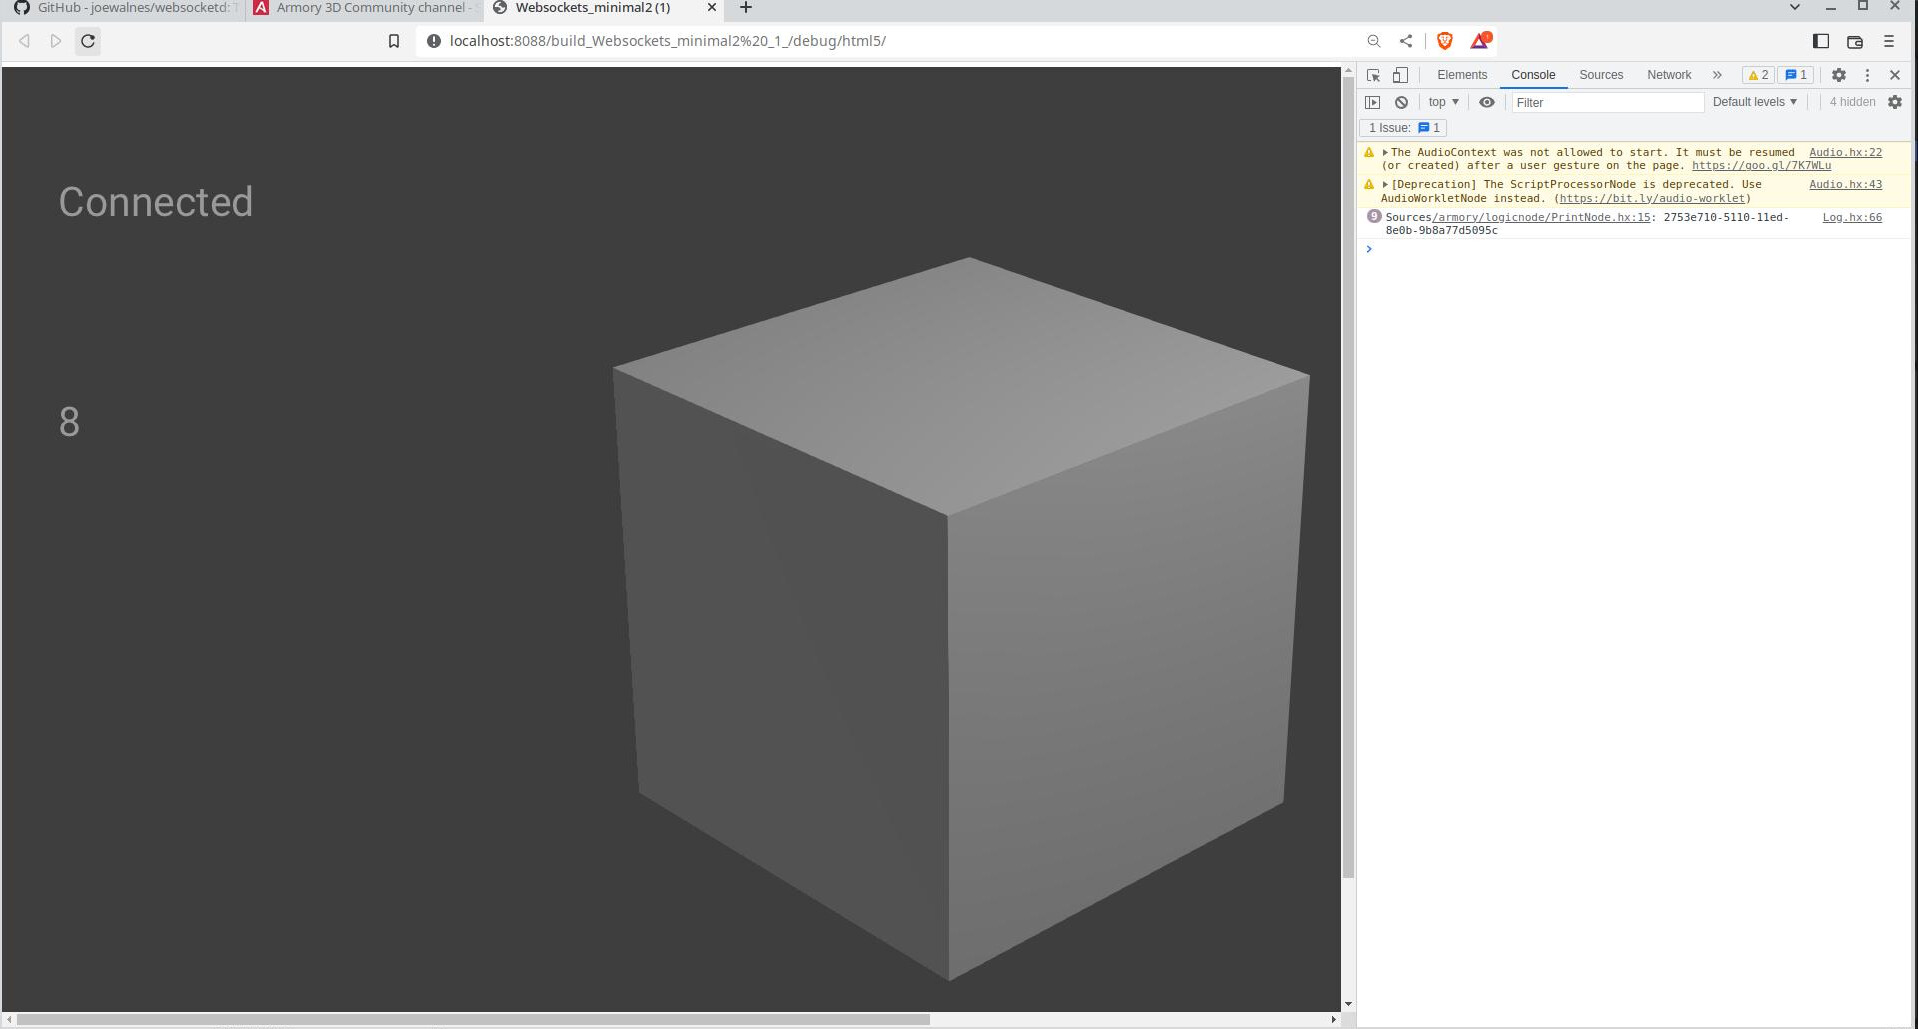
3 Likes
Special thanks to @QuantumCoderQC for adding draw to material image texture (in the past).
 #armory3d")
Seems like the biggest difference to canvas text is, that i can bind the text plane to an object and move it around. Thats why he calls it 3D. If i do not want to move it in 3D space i use canvas, cause it is a lot simpler to set up.
2 Likes