HDR Lightmaps [Addon]

HDR Lightmaps [Addon]

Overview

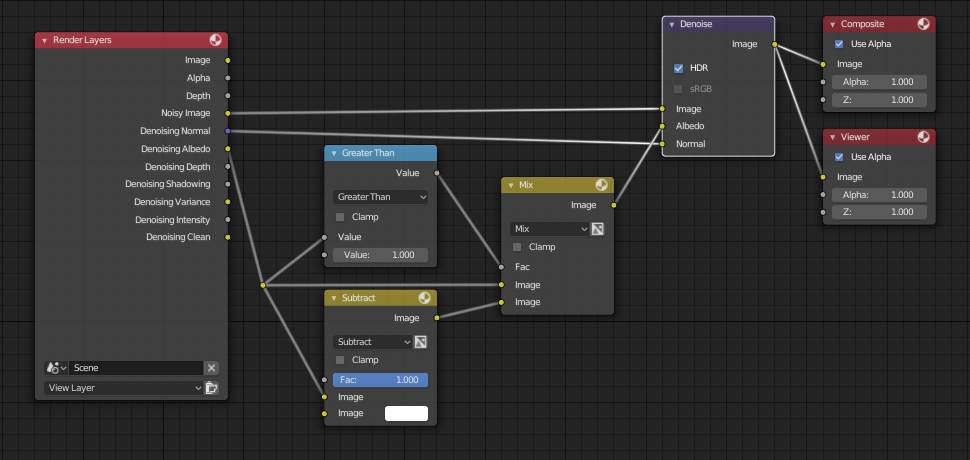
I’ve recently begun working on trying to bring Lightmapping into Armory using Cycles for the Global Illumination. So far I’ve gotten some quite nice results. The lightmapper uses the armory baketool interface, and includes a great bundled denoiser from intel, postprocessing tools and HDR encoding.

What is HDR lightmapping and why use it?

Lightmaps are essentially textures that holds information about the surface luminance of objects, and have been used in games for a long time, as they’re cheap and easy to work with. Defining a scene with ordinary dynamic lights usually has two downsides: Reguler shadow casting lights are still rather expensive on the GPU even on deferred, and especially on mobile devices, and they don’t bounce the light around in an environment, meaning they only provide direct lighting information unless you provide expensive secondary means of doing this (such as Voxel GI or SSDO).

With HDR Lightmaps, you can potentially have unlimited lights in your scene as these are baked into your textures not to mention they’re much less expensive than dynamic lights. The difference between reguler lightmaps and HDR lightmaps is the larger range - Where normal lightmaps have a range between 0 to 1, HDR maps can act as light sources with values from 0 to 6 (gamma space), or 6^2.2 in linear space.

Researching on how other engines does it

If we compare it to the other “main” game engines on the market, they all employ similar means of lightmapping, but with different encoding schemes and different ways of calculating the GI.


In Unity, they recently shifted from primarily using Enlighten (a semi-realtime radiosity solution; I never got it to work right) to using their own Progressive Lightmapper (PLM). The PLM is a CPU (and GPU WIP) based path-tracing (similar to Cycles) lightmapping tool, which progressively renders out a lightmap and filters it using either gaussian filtering or A-trous filtering. The result is then encoded either as dLDR, RGBM or stored in BC6H (able to use EXR files). There’s also the possibility of additional light information maps for storing dominant light direction and specularity.


In Unreal Engine, a tool called Lightmass is used to calculate the global illumination, but unlike PLM which uses path tracing, Lightmass uses Photon Mapping to calculate the GI. Photon Mapping is faster when it comes to interior scenes, needs less filtering (it becomes splotchy rather than noisy) and faster with caustics (although this is unsupported in UE4). The lightmaps are directional similar to Unity’s, with per-pixel normal stored with the lightmap, ending with two sample lightmaps, not entirely sure but it looks like a variation of LogLuv encoding.


Frostbite primarily use something called Flux, which is a path-tracer, that I suppose is somewhat similar to what Unity uses. They mention post-process denoising, but I’m not sure if they mean actual ML denoising, such as then one implemented in this addon. They seem to have a specific workflow, where rough proxies are used for lightmaps, and the lightmaps from these proxies are then projected to the underlying geometry. I suppose the pro’s of doing this could be related to less hassle with seams. In any case, how this happens, I don’t know, but the presentation is worth a read. I might be able to make something similar, but I’ll have to look into how the datatransfer modifier works exactly.

CryEngine and Unigine doesn’t use lightmapping, they seem to use some kind of Voxel GI.

How is this different than what the Armory baketool does?

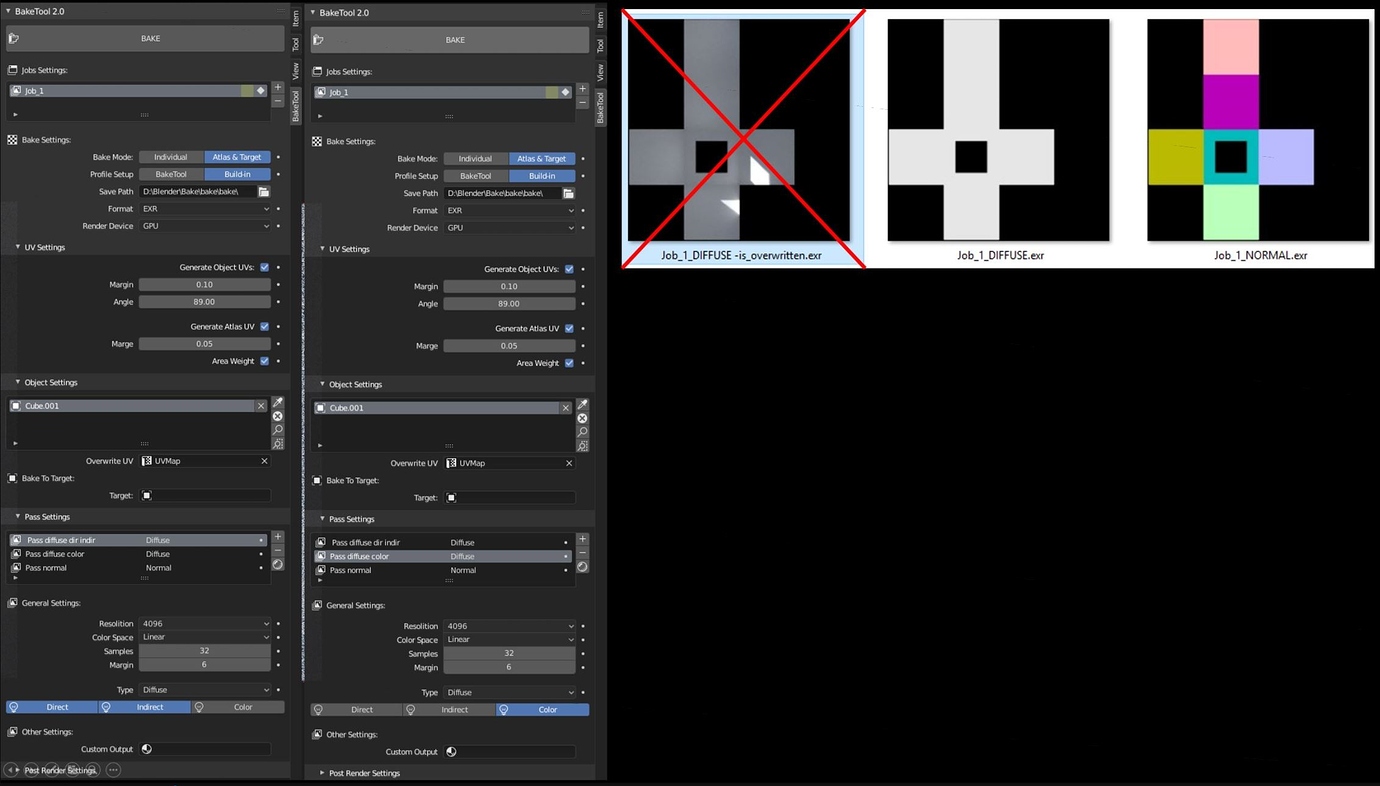
The Armory baketool currently only bakes “complete maps”, which is a full flattened 8-bit map for diffuse map, for the same reason the lightmaps primarily work with the “lightmap” renderpath preset, which has a limited shading suite, and lack of dynamic light - Similar to old games Quake with pre-baked 8-bit diffuse maps with both lights and shadows, just with higher quality.

With HDR Lightmaps, there’s support for PBR materials and shading with deferred lighting mode. Think of it in this way, by default everything is black like in reality, where the lighting adds up from 0 to the specific luminance. In this way, instead of being a flat 8-bit map, a high dynamic range is introduced for each lightmapped object. In order to conserve memory, the baked 32-bit HDR maps are encoded into 8-bit RGBM/RGBD lightmaps, where the alpha channel acts as an hdr component. Decoding is done through pre-made shader nodegroups.

Other pro’s of using lightmaps is that ordinary lights still works and are able to cast light and shadows unto objects with lightmaps. Also, as the lightmaps are baked, these can be reused for different materials and textures

What about noise? Isn’t that still a problem?

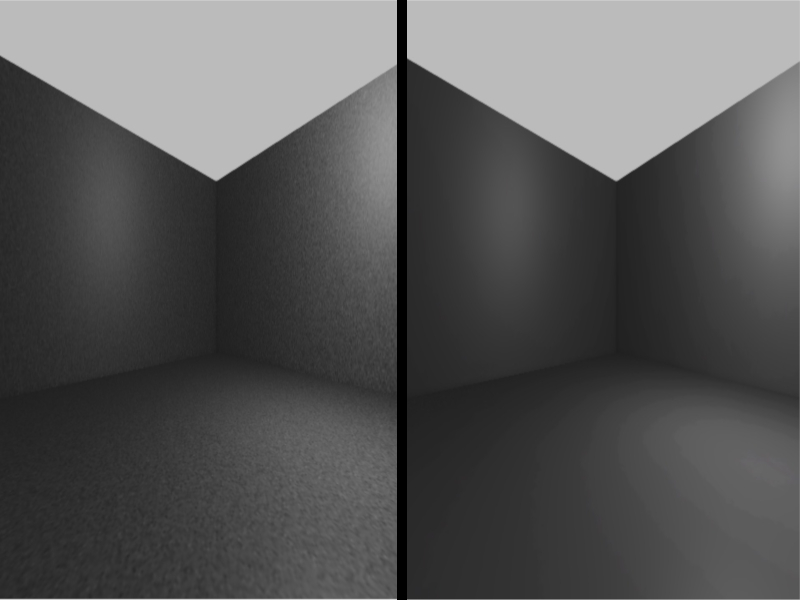
No, this is another part of the addon - First it denoises the lightmaps using Intels Open Image denoiser (Bundled), which uses deep-machine learning to filter out noise made specifically with path tracers using Monte-Carlo ray-tracing methods (which cycles does). The denoising is fast (faster than the native blender denoiser) and effective, only downside is that the images needs to be converted to .pfm files first - Blender doesn’t support that format, but it’s handled by the addon. Afterwards, theres the option for GIMP-based post-processing might be useful, as not all noise might be removed (especially if very few samples are used). Additional blur filtering and despeckle filters helps on that, and all of it is handled by the addon, you only need to provide a path to your GIMP binary folder. (NOT YET IMPLEMENTED / READY)

How does it work?

It works by building a lightmap, technically it’s a diffuse map, but with only the light contribution baked out either as indirect, direct or combined. This map is baked as a 32-bit float map for each object, and then converted to a .pfm format, in order to be able to denoise it. Denoising happens with Intels denoiser and takes a few seconds. It is then imported back into Armory, encoding into RGBM for compatibility reasons, and automatically applied with a decoding node setup. This setup automatically sets itself up according to your materials. Depending on your configuration, your encoded file might go on a trip into your local GIMP installation for further postprocessing.

How do I actually use it?

! I’ll make a video tutorial sometime next week, if I can edit posts after that long time on !

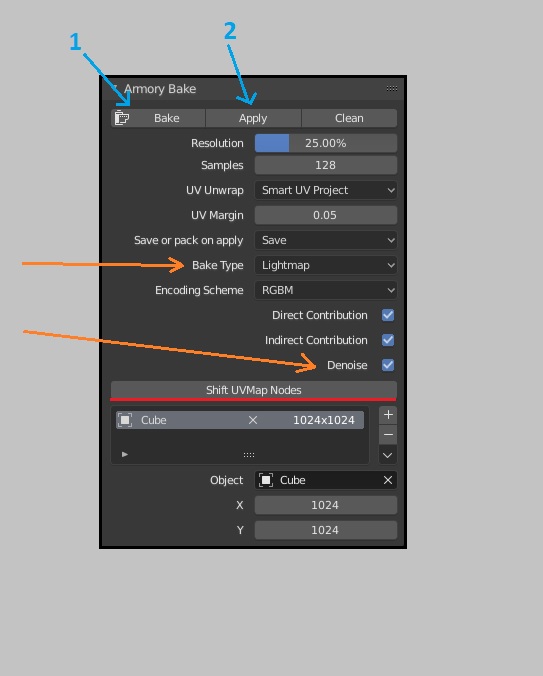
To install: Just copy or clone it into your armsdk folder. Open Armory, scroll down to your “Armory Bake” tab, and set bake type to “Lightmap”.

Set your UV-margin to something like 0.05 to give your packing a little space, depending on your lightmap size, and filtering options.

Also, note for now it is recommended to choose the option “Save” on apply, as packing it into the .blend file seems to cause crashes with the current Blender beta version.

When you bake, 32-bit float maps will be baked and saved into your “/Lightmaps” folder if the option is chosen.

When you click Apply afterwards, these maps will be saved and denoised. When they are denoised, a node-setup will be applied automatically to your material setups, and applied to your basecolor.

By default, the lightmaps might seem a bit weak compared to Cycles/Eevee due to different color management, but it can be adjusted by:

  • Try messing around with the Armory tonemappers

  • Crank up the exposure value (Look under “Film” in Cycles)

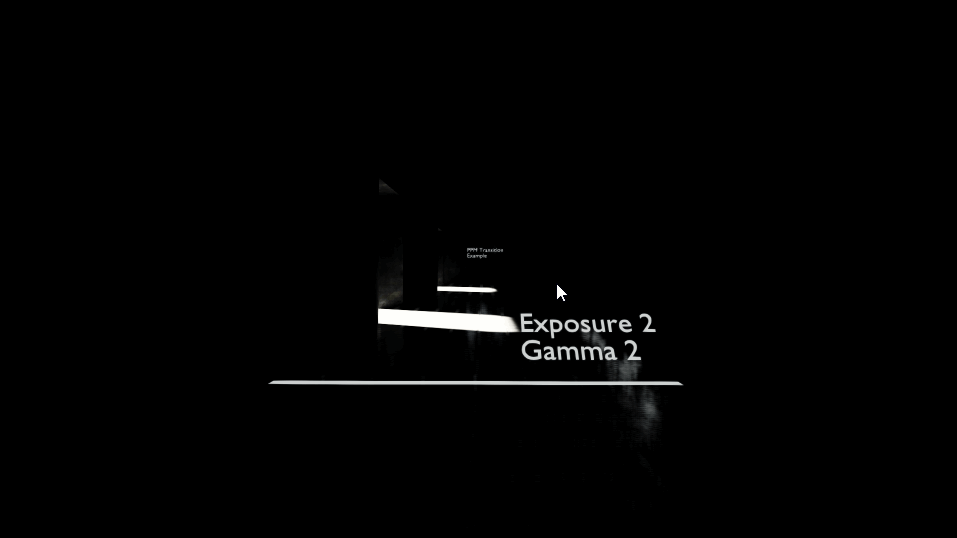
  • Try out the latest Postprocess settings (Addon here: https://github.com/Naxela/PPM) - It opens up for node settings, such as exposure, gamma, gain, etc. which can help in terms of that.

I’ve provided a function to easily shift all uv maps, so it toggles between Eevee view and Armory view, as Armory for some reasons shifts the UV index on baked maps.

Future / Todo

The current version is very early work in progress, and there’s still a lot to do but you can still use it as it currently is if you want.

  • Distributed network rendering for baking lightmaps - Maybe look into crowdrender blender plugin

  • Add the possibility of using normal and albedo maps, for better/faster denoising

  • Add separable direct and indirect contribution

  • Lightmapper Tools palette

  • Lightmap to proxy, baking and projection

  • Investigate LogLuv encoding

  • Add manual encoding range

  • More tutorials and tips

  • Step-based configuration interface

  • Quality presets

  • Compression

  • Lightmap conditional sets and blending

  • Directional lightmaps

  • Atlas packing

  • Texel density measurements

  • SciPy processing (alternative to GIMP)
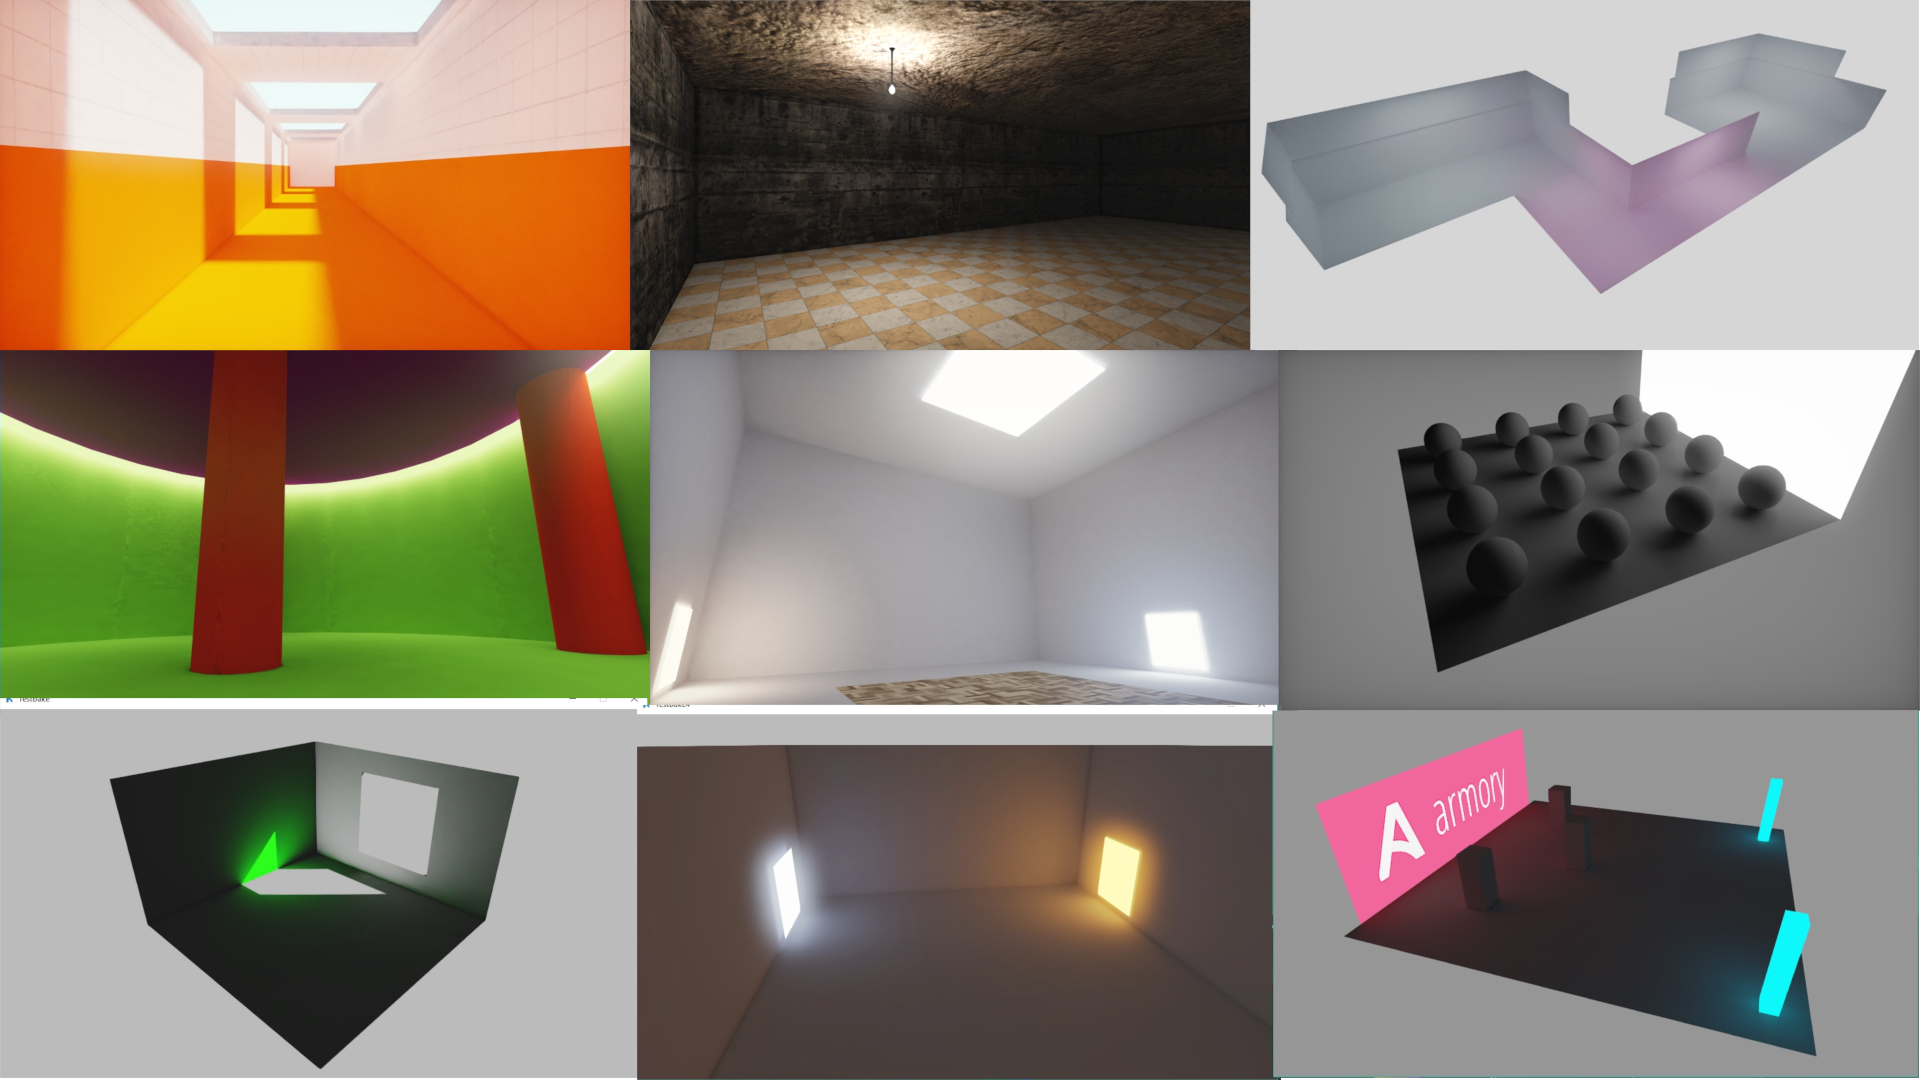
Gallery

Tips and tricks

  • It works best in well lit environments - if you want dim/dark environments, it’s better to bake it as bright, and then decrease the light levels through exposure values to better fill the range.

  • Before you apply/denoise, make sure you turn your displays to “Wireframe” or “Solid” mode, as it seems to crash otherwise once the textures are applied (Due to the Blender Eevee version that Armory 0.6 comes bundled with)

  • If your results look weird, it MIGHT help to:

  • Change your world/environment settings

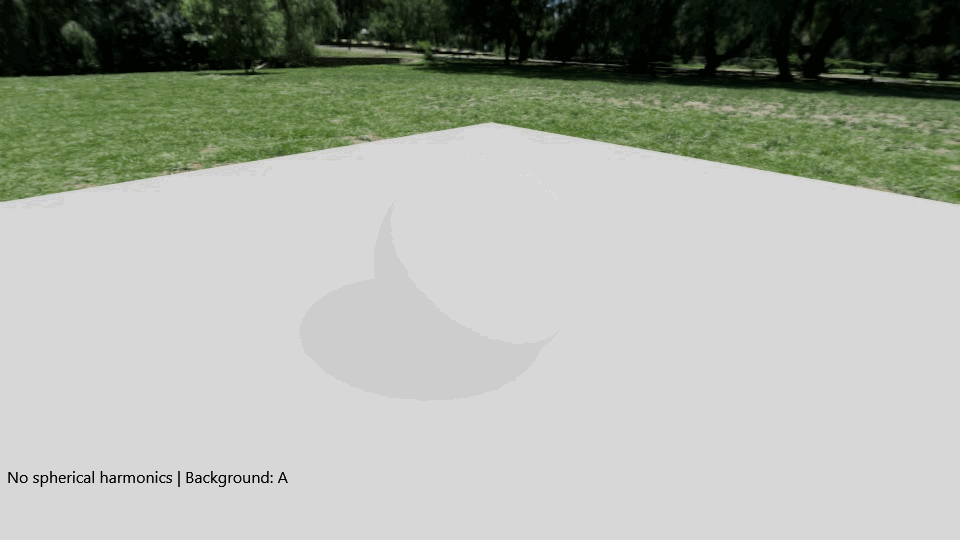
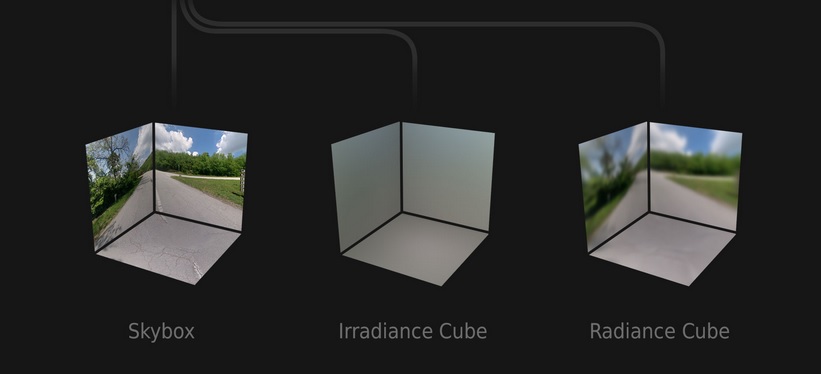
  • OR turn of “Irradiance” and “Radiance” probes under the renderpath world settings, maybe due to spherical harmonics being applied to the baked result.

  • Use RGBM encoding for most of your stuff, although RGBD might look better with highlights in rare cases.

  • Don’t use underscores for material or object names, it breaks the bake-tool! Use dots or lines instead

  • Due to the compression of light values, interior values can really be a pain but it’s possible to get good results with even large ranges

  • Controlling the lightmap properties with a brightness/contrast node can be useful

Download

Get the latest copy from github here:


Keep in mind, it’s early WIP and might not work and/or require a little bit of messing around with settings!


Post-Process Module (PPM) Addon

PPM is another addon for armory, that introduces post processing as nodes - It’s still currently in an early stage, but should be usable. Like the HDR Lightmap addon, it’s only available for Armory 0.6 so far - It’s incompatible 2019.5 (Update is in progress). - I can post another thread with more info for this addon too, if people want that?

Sources and references

https://github.com/AlanIWBFT/UnrealEngine/tree/MLDB-4.9.2

22 Likes

Wow @Naxela, that is a very cool presentation. Looks like you really researched this and did well putting together the tools for it. Good job! Maybe this could help your Half-Life 2 inspired scene that you made earlier look even better. :wink: Always cool to see what you put together.

Dang! This looks fantastic! Can’t wait to give this a try! :two_hearts:

Nice!!! Looks great! But I unfortunately can’t bake with my GPU, is that a bug? I hope it is, my CPU is not that good… here my Console Log: (Win 10 GTX 1060 intel i5)

Smart Projection time: 0.00
Info: Once baked, hit ‘Armory Bake - Apply’ to pack lightmaps

CUDA error: Illegal address in cuCtxSynchronize(), line 1861

Refer to the Cycles GPU rendering documentation for possible solutions:
GPU Rendering — Blender Manual

CUDA error: Illegal address in cuFuncGetAttribute(&threads_per_block, CU_FUNC_ATTRIBUTE_MAX_THREADS_PER_BLOCK, cuShader), line 1851
CUDA error: Illegal address in cuFuncSetCacheConfig(cuShader, CU_FUNC_CACHE_PREFER_L1), line 1855
CUDA error: Illegal address in cuLaunchKernel(cuShader, xblocks , 1, 1, threads_per_block, 1, 1, 0, 0, args, 0), line 1859
CUDA error: Illegal address in cuCtxSynchronize(), line 1861

this repeats a bazillion times, then:

CUDA error: Illegal address in cuLaunchKernel(cuShader, xblocks , 1, 1, threads_per_block, 1, 1, 0, 0, args, 0), line 1859
CUDA error: Illegal address in cuCtxSynchronize(), line 1861
CUDA error: Illegal address in cuCtxSynchronize(), line 2153
CUDA error: Illegal address in cuMemcpyDtoH((uchar*)mem.host_pointer + offset, (CUdeviceptr)(mem.device_pointer + offset), size), line 965
CUDA error: Illegal address in mem_alloc_result, line 850

this repeats a bazillion times, then:

CUDA error: Illegal address in mem_alloc_result, line 850
CUDA error: Illegal address in cuCtxSynchronize(), line 2179
CUDA error: Illegal address in cuCtxSynchronize(), line 2153

this repeats two bazillion times, then:

CUDA error at cuCtxCreate: Illegal address

Refer to the Cycles GPU rendering documentation for possible solutions:
https://docs.blender.org/manual/en/dev/render/cycles/gpu_rendering.html

CUDA error: Invalid value in cuCtxDestroy(cuContext), line 318
CUDA error at cuCtxCreate: Illegal address

Refer to the Cycles GPU rendering documentation for possible solutions:
https://docs.blender.org/manual/en/dev/render/cycles/gpu_rendering.html

CUDA error: Invalid value in cuCtxDestroy(cuContext), line 318
Info: Baking map saved to internal image, save it externally or pack it
Error: CUDA error at cuCtxCreate: Illegal address
Info: Baking map saved to internal image, save it externally or pack it

It is a bug, but a Blender one sadly - I unfortunately get the same problem on my system (I’ve the exact same specs), and it seems to be a general problem when baking in Blender with CUDA devices that still haven’t been resolved:

https://developer.blender.org/T52572

Hopefully it’ll be resolved in the next Blender/Armory release, but it seems it’s been persistent and a bug for quite a while, sadly

1 Like

This looks super useful, Thanks! Can it work outside of Armory with a more recent build of Blender 2.8?

Unfortunately not yet - I’m planning on streamlining the baking process and interface more in the future, but for now it’s tied to Armory, as it uses the Armory baketool menu

Amazing addon! I’ll try it soon. How dynamic objects or characters are affected? does the irradiance grid from Eevee works? you know the spherical harmonics thing.

Hi. Because we have cycles i think it s worth to have a look on Spherical Gaussians too.

Here an nice blog

and for comparisson

1 Like

Hi. Baking a diffuse color pass with cycles and use this additionally in the OIDN albedo input improves the result a lot.
Mostly for lower sample bakes.
It s really fast calculated in cycles bake.

Did not find a way to use the OIDN normal input.
Do you have an idea?

@Simonrazer I think the bug with the GPU baking have been fixed now. At least on my end, baking with the GPU works just fine with the official 2.80 release.

@gary The latest version of the addon works without Armory, and now outputs .HDR files that you can use in other game engines too.

@Aryoksini

Dynamic objects aren’t affected by this, and it’s purely for static baked environments (Initially, I just made the addon for architectural visualization), but I have been looking into the Spherical Harmonics and Spherical Gaussian things, but I haven’t made a lot of progress - finding a way to do it efficiently has proven problematic. But with that being said, I did notice Lubos tweeted about working on Irradiance Probes/Grids, so maybe he’s better at progressing in that regard. I guess this is where it could be similar to how UE4 does it, with Lightmaps for static objects and volumetric grids (irradiance probes) for dynamic objects.

@Sascha_Schulz I’ve only been looking briefly into it, and it could probably be nice to look at it after some sort of irradiance/SH grid is in place

As for your question about baking, my initial plan was to automatically use the albedo/diffuse map and the normal map provided through the Armory PBR material group, although node-handling in Armory through python is a bit of a pain when dealing with lots of code. I’m planning on doing more work on this addon in the future when I get more time.

2 Likes

Hm, I want to try again but I can’t install the addon this time. As far as I understood the procedure should just be git clone the repository into the armsdk folder, right? The bake tab doesn’t look different at all. Nothing in the console, I have got the newest armsdk right now.

@Simonrazer I downloaded the repo as a zip and loaded it into Blender release via the Add-ons tab in prefs. Only had a few minutes with it but seems to work well.

Nice work @Naxela thanks!

@Simonrazer

Hi, the addon is supposed to be installed just like a regular addon as gary mentions - I should probably rewrite the installation procedure text, but sadly I can’t edit old posts on this forum :confused:

The new UI is supposed to look like this (Left for Render panel; Right for Object panel):

With that being said, there’s still quite a few quirks I’m working out, namely with node-handling and naming-circumvention (It doesn’t like underscores)

Also, can someone try to see if the OpenCV installation button works for the filtering? Or does it give errors?

I would prefer an albedo an normal solution sourced from cycles.
It would also allows the use for eevee and spread the use.
But i can understand that that is not your focus.

The official Blender OIDN integration is finished soon so i hope they generate needed AOV s like the normals for cycles bake too.

For further studing existing solutions you should have an look on Bakery, too.
Unity PLM ist far away from delievering a productive solution and Bakery is at the moment the star on Unity Front.
It s outperforming Unitys and Unreals solution in terms of quality and performance by a factor.

some benchmark i did.
(click in view attachments in link for results and settings)
https://forum.unity.com/threads/bakery-gpu-lightmapper-v1-6-released.536008/page-65#post-4763765

in short…
Bakery 1.6.
00h29m19s
LightMap Quality *****

PLM
05h40m19s
LightMap Quality **

Enlighten+FG
12h34m08s
LightMap Quality *****

However it s based on Optix and Optix Denoiser (he will have an look into OIDN, too)but thats not the point here because Cycles and OiDN deliever similar speed and performance.

All other solutions and doumentation is a good read and Fix seams and other tricks are unique.

It supports all Unity Mixed Lighting Modes and following DirectionalModes what makes it a good readable source who reflect state of art solutions.

Baked Normal Maps

Still no directional data, but normal maps are taken into account when rendering the lightmap. There is no additional runtime overhead. Since lightmaps usually have lower resolution than normal maps, the result may look blurry. Other problems include aliasing at distance due to lack of mipmapping and denoising step potentially smudging the detail. To learn how to use custom shaders with procedural normals in this mode, read Normal Mapping section.

Dominant Direction

This mode is similar to what Enlighten and Progressive bake in Unity. It is compatible will most shaders, only generates one additional map and the runtime overhead is minimal. The downside is that bump-mapping looks rather faint and gray-ish and can be quite different comparing to the same object under real-time lighting.

RNM

Based on Radiosity Normal Mapping technique originally invented for HL2 (slides) and later used in many games (e.g. Mirror’s Edge). It generates 3 HDR maps in total, being the most memory-demanding mode of all. Runtime overhead is still relatively low. This mode is more precise than Dominant Direction. It is better at reproducing surface contrast and handling colored lights affecting normal maps from different angles.

SH

Based on “Precomputed Global Illumination in Frostbite” paper. This is the highest quality mode, giving much better surface contrast and representing differently colored lighting coming from different directions. Generates 4 maps in total, only one of them being HDR, therefore takes less memory than RNM. Runtime overhead is slightly higher than that of RNM.

Manual
https://geom.io/bakery/wiki/index.php?title=Manual

AssetLink
https://assetstore.unity.com/packages/tools/level-design/bakery-gpu-lightmapper-122218

1 Like

If I understand you correctly, you mean baking an albedo and normal map from cycles before baking the lightmap, so they can assist in the denoising? If so, that shouldn’t be a problem adding that, as ambient occlusion is already on my to do list, and adding those two wouldn’t be a problem either.

As for The Bakery I have been getting some inspiration from it, although I’ve mainly been looking into the SH-based solution. So far it’s been mainly experimenting with changing SH coefficients based on HDR maps with the solution Armory uses, where the radiance and irradiance data is gathered with CMFT.

But in general it’s something that I’ve postponed looking into for now. I’m planning on more refactoring to make the addon simpler to maintain, and especially the node-handling has first-priority for now.

Yes. I did some tests with ECycles who has OIDN integrated as
compositor node.

Baked with cycles and piped to OIDN compositor node

  1. OIDN image = diffuse direct and diffuse indirect ,ok
  2. OIDN albedo = diffuse color, ok, improves result for low samples
    a lot
  3. OIDN normal , for now no world or view space OIDN needs
    available.
    Cycles bake gives me tangent or object space normals.
    Or are cycles baked object normals the same like image world
    or view space normals OIDN requires according to the OIDN
    docu.?

Here the cycles bakes which i pipe to OIDN compositor node.

(ignore the red x, is only showing that bake tool overides this)

The SH is my favourit too.
Do you have already an idea how to bake this 3 additional maps with cycles?

Only SG Lightmaps and Probes get over it.) But has some overhead and manual fitting.

The CMFT approch you mentioned i did not understand for now.
I will have a closer look to Armory this week.

Keep on your hard work. Already a fan.

1 Like

I must admit, I haven’t tried neither E-Cycles or Baketool, so I can’t really tell how it works. But as for the normal map, I’m not entirely sure how much they’re supposed to help. So far I’ve only tried with texture-space normals and tangent-space normals with slight increase in speed, as I presumed the reason they wrote world/view space was simply that OIDN was made with image renders in mind (which are usually never tangent or object space anyway), but that’s not to say that it couldn’t potentially work with object/tangent space normals - I don’t really know which kind of ML training sets the OIDN denoiser is developed with.

As for the SH, so far I’ve only been tinkering with the way Armory does it. I’m not entirely sure how The Bakery does it, but what I’ve been tinkering with is rendering out HDR equirectangular maps with Eevee (with a script, as it’s not yet supported) for specific points (probes, essentially), and using the output HDR map with CMFT to make the specular(?) radiance (for reflection) and diffuse irradiance (for sh coefficients) and pass it to Armory, as it has shader code for SH, although it’s only a single world map hdr:

What I’m hoping, is to be able to either designate specific SH-coefficients to specific objects (so objects can share based on positions OR blend between HDR/Radiance/Irradiance maps based on position, so every objects doesn’t need a lot of individual textures.

Also, as for nVidia Optix, I’m planning on adding that as a possible denoiser choice too, the problem is mainly that I can only find the binaries for Windows and it’s seemingly only for CUDA devices, which seems quite limiting, but there can be a small speed boost if there’s quite large lightmap textures or multiple GPU’s, but I think it’s niche cases.

I will call Intel on monday.)

Bake Tool only allows batch baking from lots of jobs.
It uses pure cycles bake api. Nothing special here.

ECycles has OIDN integrated as Compositor Node with image, albedo, normal input. Nothing special here.

The additional Albedo for Oidn i tested a lot and it improves the result in every case. The additional bake of the diffuse color pass needed is fast and makes a great addition.

The additional normal helps to preserve details i am not sure lightmaps benefit much from them.
But…
Here an 8K combined bake i use in production.
Baked in Cycles for Unity.
See details in zoom view. (the forum jpeg compression destroyed these complete. There a very fine bump structures visible.)

In such cases i think the additional normal pass helps to preserve details. Because i don t have one i could not really test it.

So for advanced directional modes it could be important to preserve these details in denoising .Will see.

I will have a closer look at the SH Directional Mode in Bakery.
There are 4 HDR Lightmaps as output and it think it works without SH Light Probes(pretty sure on that, i check). It simply gives the best quality when colored lights , shadows and normal mapping is involved.
I use it since 5 months but did not digged deeper.

Optix denoising is great but OIDN on paar.
So it s only nice to have.
Official Cycles has Optix RTX acceleration implementation sponsored from Nvidia now integrated.
https://developer.blender.org/D5363
Think it will land in 2.81.
The Optix denoiser even for viewport denoising is planned too with support from NVidia.

So Optix is now integrated in the driver and will get an deep official integration to Blender (because GPL conform now).No need for now to do extra work on this.

In case you don t know the official OIDN integration as compositor node is happen here.
https://developer.blender.org/D4304
Just found a valuable info there about the Albedo

This setup is a simple fix for the wrong “Denoising Albedo” pass.

ECycles has it already abailable but paied.

@Naxela Ok I got it working now… kind of. It seems like the Mix RGB -> multiply node is broken for me, so only the bounce light will be colored.
Edit: It seems to be an issue with the addon because when replicate the material (the texture only works at all(otherwise black) if I use the Lightmap UV as well, that’s inconvenient) it works fine and looks superb.

Or maybe I have a totally different bug because all bakes of materials in which the object’s material is colored result in a mostly white image (with shadows+indirect colored light), as if the material was replaced with a default one.